 Floating solar arrays are gaining popularity in Asia and Europe but have not yet caught on in the United States. That may soon change, as this floating solar array is so practicable.
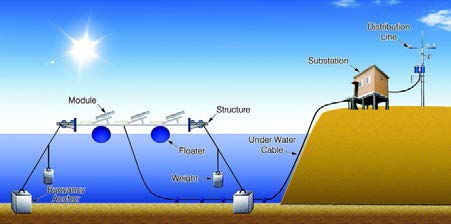
The floating solar technology we’re using is very similar to the technology the Japanese are using for their floating solar arrays. The floating system is HDPE-based (plastic). If you look at some of the Kyocera projects in Japan, they link together into a mat, and each float supports one solar panel. You have an interlinked series of floating pads that support the panels. There’s an anchoring system that anchors to the shore or floating anchors. We’re doing shore mounts, so the system will be anchored to the shore line so it doesn’t move. There are access walkways to get out on the array.
Inverters are located on the shore side, identical to a normal ground-mount system. The system for supporting the panels integrates everything on site. We’re joining [wires] in boxes on the floating array. We’re linking together our AC circuits and are moving to shore with marine-grade submersible cable. The cables are supported by a floating system that supports the cables as they move off to the inverters. All the components we’re using are rated for a marine environment.
Once French floating solar specialist Ciel et Terre made their solar floatings on solar arrays on our this blow molding machine.
The exact plastic parts on solar floating as below:
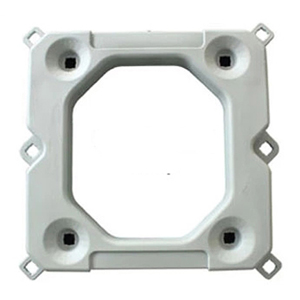
Main floating body
Fastener parts on solar ploating
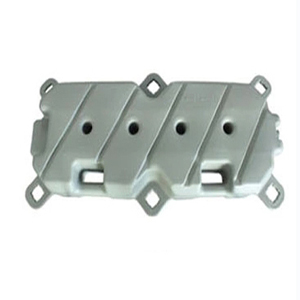
Aisle on the solar floatings
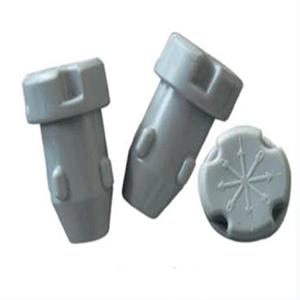
Supporting legs on solar floating

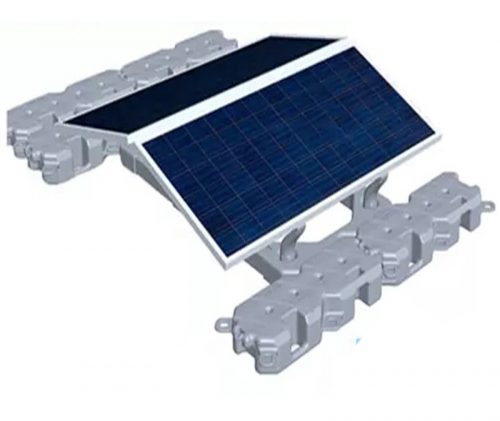
Each individual panel and the walkway section is an individual float that is connected with HDPE pins. It’s kind of a repetitive piece of equipment; you’re assembling them in mats on-shore and then moving those mats onto the water. Then you’re assembling the mats into a larger and larger mass within the water body. It has a very low impact on the shoreline. Solar array is also able to take a small area, build up Yourself arrays, float them out and start joining them together on the water surface. groupings of 50 panels or 75 panels on-shore, move them into the water, and before you know it, we have 10,000 panels.
Solar array float mouting system advantages:
1) maximize space utilization design;
2) unique bracket design, easy to install;
3) flexible design, suitable for the solar module with 60 cells and 72 cells mostly used in the market;
4)the parts are made of high quality HDPE to ensure the performance of the materials;
5)carry out quality control on food-grade materials to ensure no toxic pollutants released;
6)easy to install without any heavy equirments;
7)rigid and peripheral double-row walkway design to make walking on water be flat and safer;
Solar floating unit installation process:
1)Mounting support legs: Place the main floating body on the floor, and then assemble the supporting legs to it. Should pay attention to the installation direction (tools would be offered)
2)Fixing fixture: fix the aluminum alloy clamp to the support leg (the clamp opening should be leaved with 2mm to clip the solar panel, and its direction should be outward)
3)Connect the two main floating bodies: use one aisle to connect the two main bodies together and lock them with bolts and nuts. Pay attention to the orientation of the mouth of the floating body and the stacking order of the floating ear plates.
4)Install the outer aisle: Pay attention to the stacking order of the floating ear plates when assembling the aisles,avoiding the warpage of the assembled rear array.
5) Install the fasteners: the bolts and nuts, the clevis pin 1, 2 & 3 should be inserted into the corresponding positions in below figures shown. The ear plate gap needs to be padded. Insert the pins in place and use a special tool to rotate the pin with 45° to make it fix well.
Watch this video to see how to install floating solar panels: